原理
es存储大量数据那就需要大量的存储空间,es官方建议是用ssd硬盘,但是成本也是个问题,那么如何在保证性能的情况下又降低成本呢,这时就可以用冷热分离。
即将集群的数据节点分为多种类型,将高性能的节点用于存储热点数据,将性能相对差些的大容量节点用于存储冷数据。
- hot节点:索引不断有新文档的写入,Indexing对CPU 、IO都有很高的要求,保存最近、最常访问的数据。推荐使用SSD磁盘,至少设置一个副本。
- warm节点:索引不存在新数据的写入,同时也不存在大量的数据查询,通常使用HDD高性能磁盘。通常用它来保存旧的索引。
索引生命周期管理(ILM)
rollover:
当现有索引被认为太大或太旧时,滚动索引API将别名滚动到新索引。
该API接受一个别名和一个条件列表。别名必须只指向一个索引。如果索引满足指定条件,则创建一个新索引,并将别名切换到指向新索引的位置。

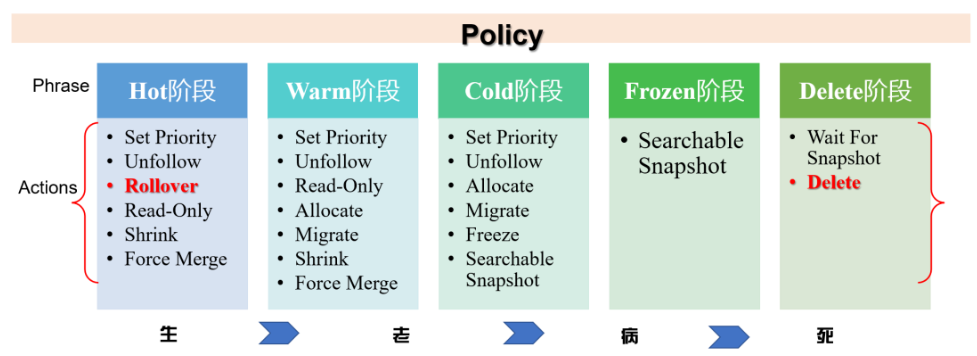
索引的生命周期有四个阶段:
- Hot:索引还存在大量的读写操作,该阶段可以根据索引的文档数、大小、时长决定是否调用rollover API来滚动索引
- Warm:索引不存在写操作,但是还有被查询的需要
- Cold:数据不存在写操作,读操作也不多
- Delete:索引不再需要,可以被安全删除或者被关闭
上述四个阶段不是必须同时存在(除hot阶段,其他为非必须)
kibana上可以更方便的配置。点击management,选择Index Lifecycle Policies。先创建一个或者多个策略(policy),然后每个策略根据实际需求去制定不同(phase)加Actions。最后将这个策略应用到索引上,实现自动化统一管理。
环境
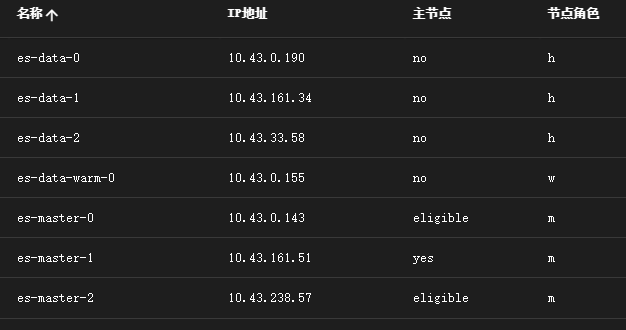
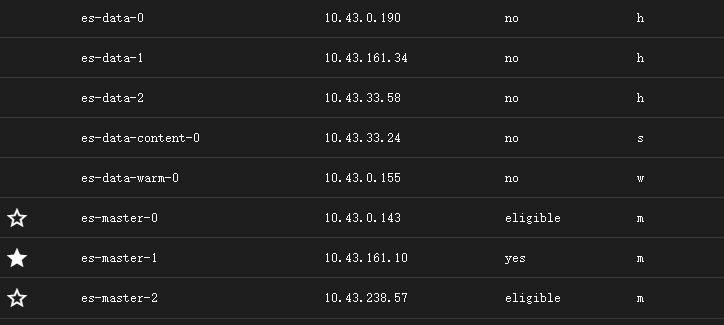
- k8s版本:1.24.16
- es版本:7.17.3
- es集群:3master,3hot,1warm
集群配置如下:
- master配置:8C 16G 500G
- data_hot配置:16C 96G 1T
- data_warm配置:8C 32G 3T
es插件:https://github.com/cars10/elasticvue
数据分布
即用户如何对冷热数据进行标识,并将冷数据移动到冷节点,热数据移动到热节点。
节点属性
通过修改values.yaml,配置node.roles来配置节点的冷热属性。
esConfig:
  elasticsearch.yml: |
    node.roles: [ data_hot ]
上面插件中已经显示了节点角色。API查询命令:
curl -X GET 127.0.0.1:9200/_cat/nodes?v=true&h=name,node.role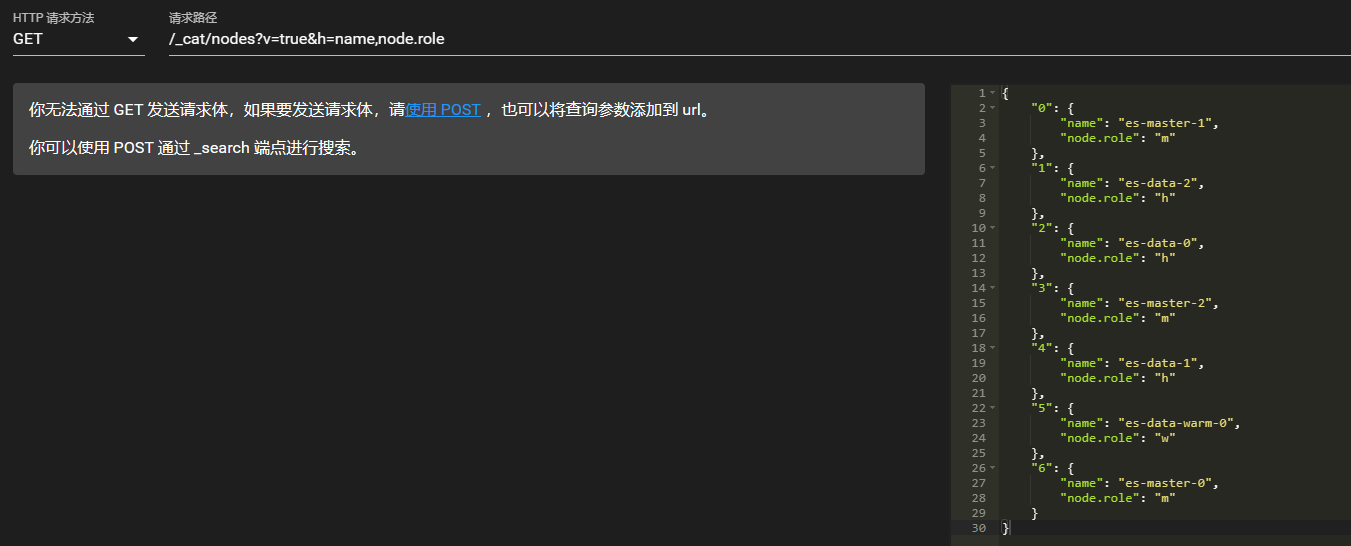
索引属性
默认情况下,集群配置了冷热属性,在没有进行特定的数据设置前,数据是不会优先写入热节点的。所以需要设置某个索引为热索引,另一个索引为冷索引。通过索引的分布来实现数据的分布。设置方法如下:
index.routing.allocation.include.{attribute}
# Assign the index to a node whose {attribute} has at least one of the comma-separated values.表示索引可以分配在包含多个值中其中一个的节点上。

index.routing.allocation.require.{attribute}
# Assign the index to a node whose {attribute} has all of the comma-separated values.表示索引要分配在包含索引指定值的节点上(通常一般设置一个值)。

index.routing.allocation.exclude.{attribute}
# Assign the index to a node whose {attribute} has none of the comma-separated values.表示索引只能分配在不包含所有指定值的节点上。

index.routing.allocation.include._tier_preference
# Assign the index to the first tier in the list that has an available node. This prevents indices from remaining unallocated if no nodes are available in the preferred tier.将索引分配给列表中具有可用节点的第一层。这样可以防止在首选层中没有可用节点时索引保持未分配状态。例如:
# index.routing.allocation.include._tier_preference: data_hot
测试
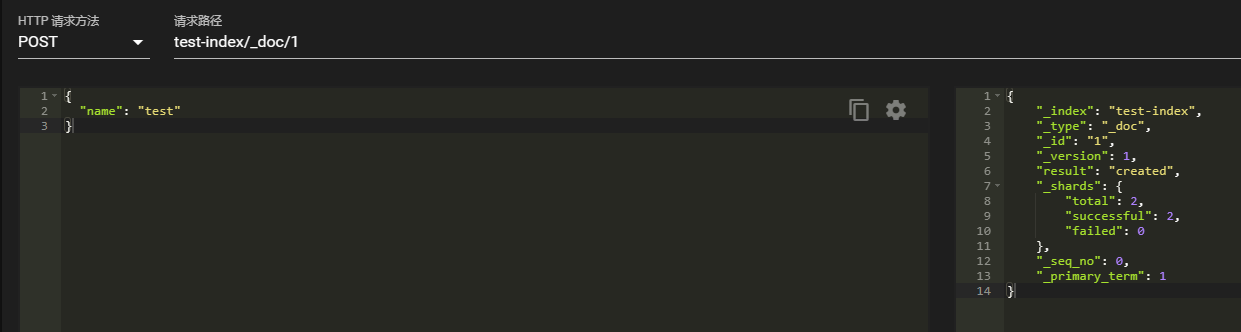
创建索引
PUT http://127.0.0.1:9200/test-index
PUT test-index/_doc/1
{
  "name": "test"
}
PUT test-index/_doc/2
{
  "age": 20
}

这里创建索引后,会显示未分配状态。集群状态变为red。查看

查看报错:"error":{"root_cause":[{"type":"no_shard_available_action_exception","reason":null,"index_uuid":"gQ_7rO6jS7ybNCZhmoRibQ","shard":"0","index":"test-index"}],"type":"search_phase_execution_exception","reason":"all shards failed","phase":"query","grouped":true,"failed_shards":[{"shard":0,"index":"test-index","node":null,"reason":{"type":"no_shard_available_action_exception","reason":null,"index_uuid":"gQ_7rO6jS7ybNCZhmoRibQ","shard":"0","index":"test-index"}}]},"status":503

查看未分配原因:
GET _cluster/allocation/explain
index has a preference for tiers [data_content], but no nodes for any of those tiers are available
因为该索引默认被分配给了data_content角色,而集群中只有data_hot和data_warm角色,没有data_content。所以这里不能在不指定索引角色的情况下,查看默认的索引分配情况了。
修改索引属性
PUT test-index/_settings
{
  "index.routing.allocation.include._tier_preference": "data_hot"
}
配置后,索引状态和集群状态变为green。

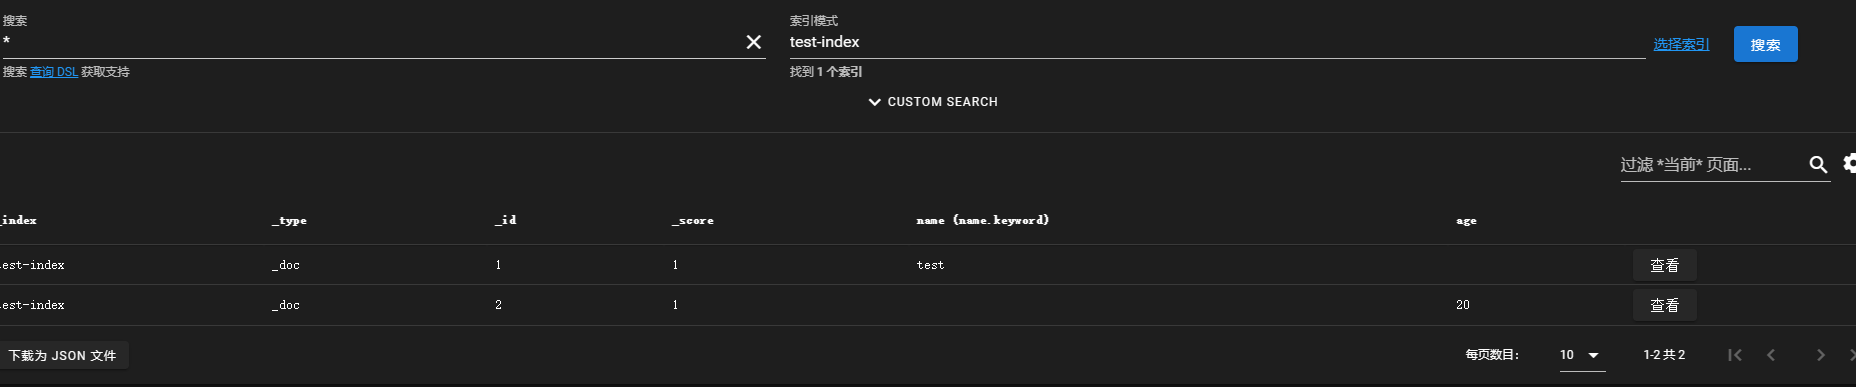
再次导入数据。
查看数据。
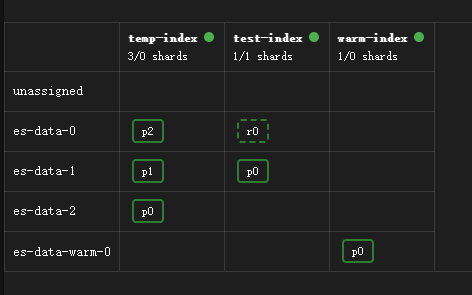
查看索引分配情况,可以看到索引分配到了es-data-0和es-data-1的hot节点上。data-1是主分片,data-0是副本。
GET _cat/shards/test-index?v&h=index,shard,prirep,node&s=node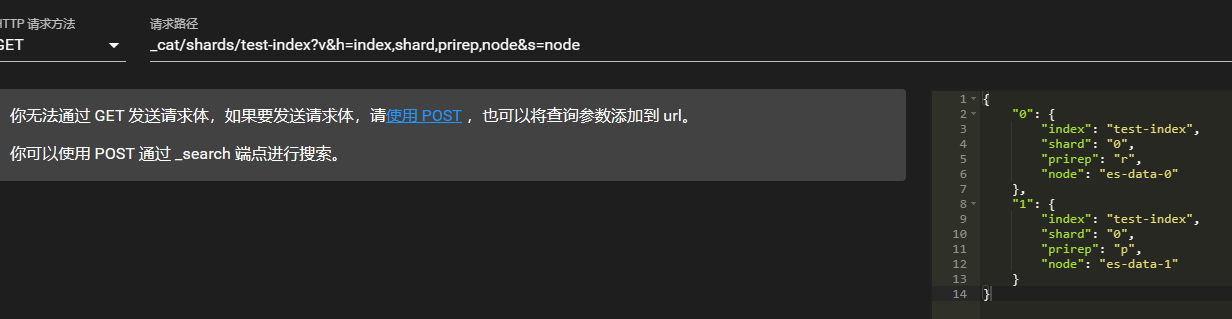

将数据写入到warm节点上,就需要将节点属性hot改为warm即可。
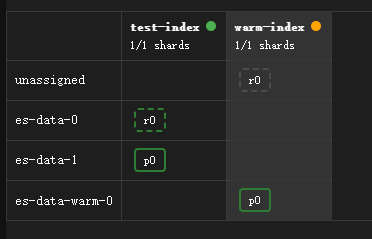
由于warm是单节点,所以无法分配副本。修改索引的副本数为0。
PUT /warm-index/settings
{
  "index": {
    "number_of_replicas": 0
  }
}
添加data_content节点
由于上方中的报错和官方文档:
The content tier is required. System indices and other indices that aren’t part of a data stream are automatically allocated to the content tier.
es集群中必须要有data_content节点,不属于数据流的系统索引和其他索引会自动分配给content层。配置:
node.roles: [ data_content ]s代表:content node。
定时任务
转移到warm节点
每天1点将前一天的数据转移到warm节点
00 01 * * * curl -XPUT -u elastic:xxxxx -H 'Content-Type: application/json' "http://127.0.0.1:9200/hot-index-$(date +\%Y\%m\%d -d'1 day ago')/_settings?pretty" -d '{"index.routing.allocation.include._tier_preference": "data_warm"}' >/dev/null 2>&1删除数据
每天2点将7天前的数据删除
00 02 * * * curl -XDELETE "http://127.0.0.1:9200/hot-index-$(date +\%Y\%m\%d -d'1 day ago')" >/dev/null 2>&1模板匹配测试
上面手动指定索引配置,将索引匹配到节点属性上,这样做确实可以实现冷热分离的效果,但是生产环境中索引众多,不可能一条一条去设置,这时就可以用模板匹配的方式来进行全局设置。
创建模板
PUT /_template/test-template
{
  "index_patterns": ["*"],
  "settings": {
    "number_of_shards": 3,
    "number_of_replicas": 0,
    "index.routing.allocation.include._tier_preference": "data_hot"
  }
}
查看模板
GET _cat/templates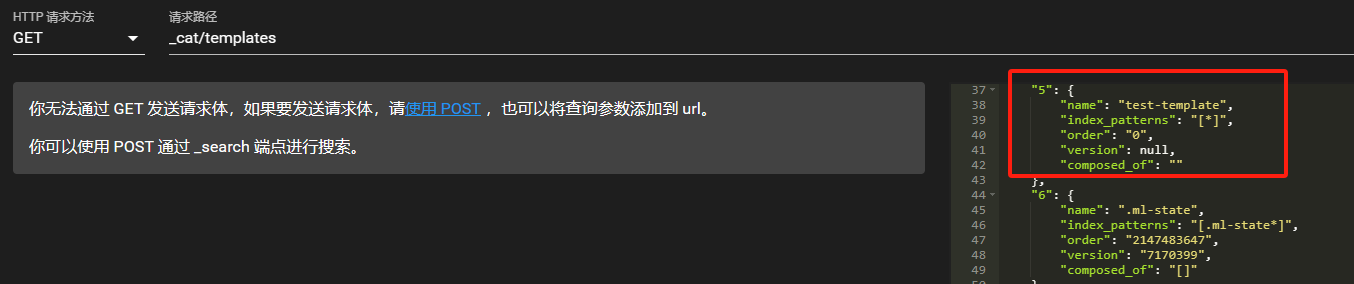
创建索引
PUT temp-index
查看分片情况
temp-index有3个分片,副本数为0,数据分配在data_hot节点上。
这样通过模板设置后,es集群的数据默认就写到热节点上了,大大提高了集群的写入速度、同时也减轻了许多手工操作,这就是模板的作用。
删除模板
DELETE /_template/test-template冷热分离+索引生命周期管理
需求:创建不同的模板,对索引进行冷热分离,在新索引数据到es后,根据索引生命周期策略,1分钟后,将数据从hot节点转移到warm节点上。并定时删除7天前的索引。具体步骤如下:
安装kibana
kibana支持的版本参照官网:https://www.elastic.co/cn/support/matrix/#matrix_compatibility
由于我的es集群版本是7.17.3,所以kibana也得安装7.17.3版本,否则就会报错版本不匹配:

bitnami的chart包目前都是es8版本,所以不能使用了。
helm search repo kibana -l
这里使用elastic的repo。
helm repo add elastic https://helm.elastic.co
helm fetch elastic/kibana --version 7.17.3
tar xvf kibana-7.17.3.tgz
查看secret
k get secret es-master-elasticsearch -o yaml修改values.yaml
elasticsearchHosts: "http://es-headless:9200"
extraEnvs:
  - name: "NODE_OPTIONS"
    value: "--max-old-space-size=1800"
  - name: 'ELASTICSEARCH_USERNAME'
    value: "elastic"
  - name: 'ELASTICSEARCH_PASSWORD'
    valueFrom:
      secretKeyRef:
        name: es-master-elasticsearch
        key: elasticsearch-password
kibanaConfig: {}
service:
  type: NodePort

helm install kibana .
启动后正常访问。

创建冷热索引生命周期策略
创建hot-policy。
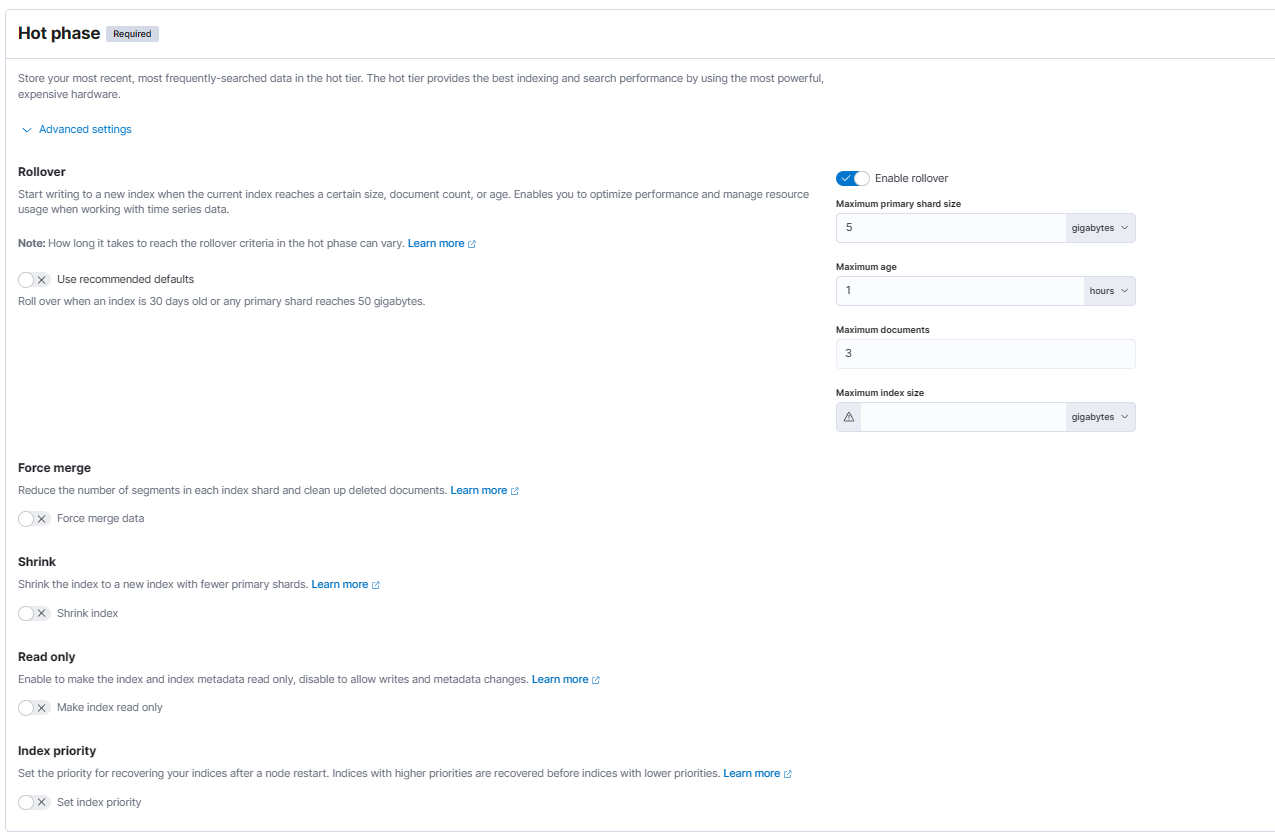
hot阶段:
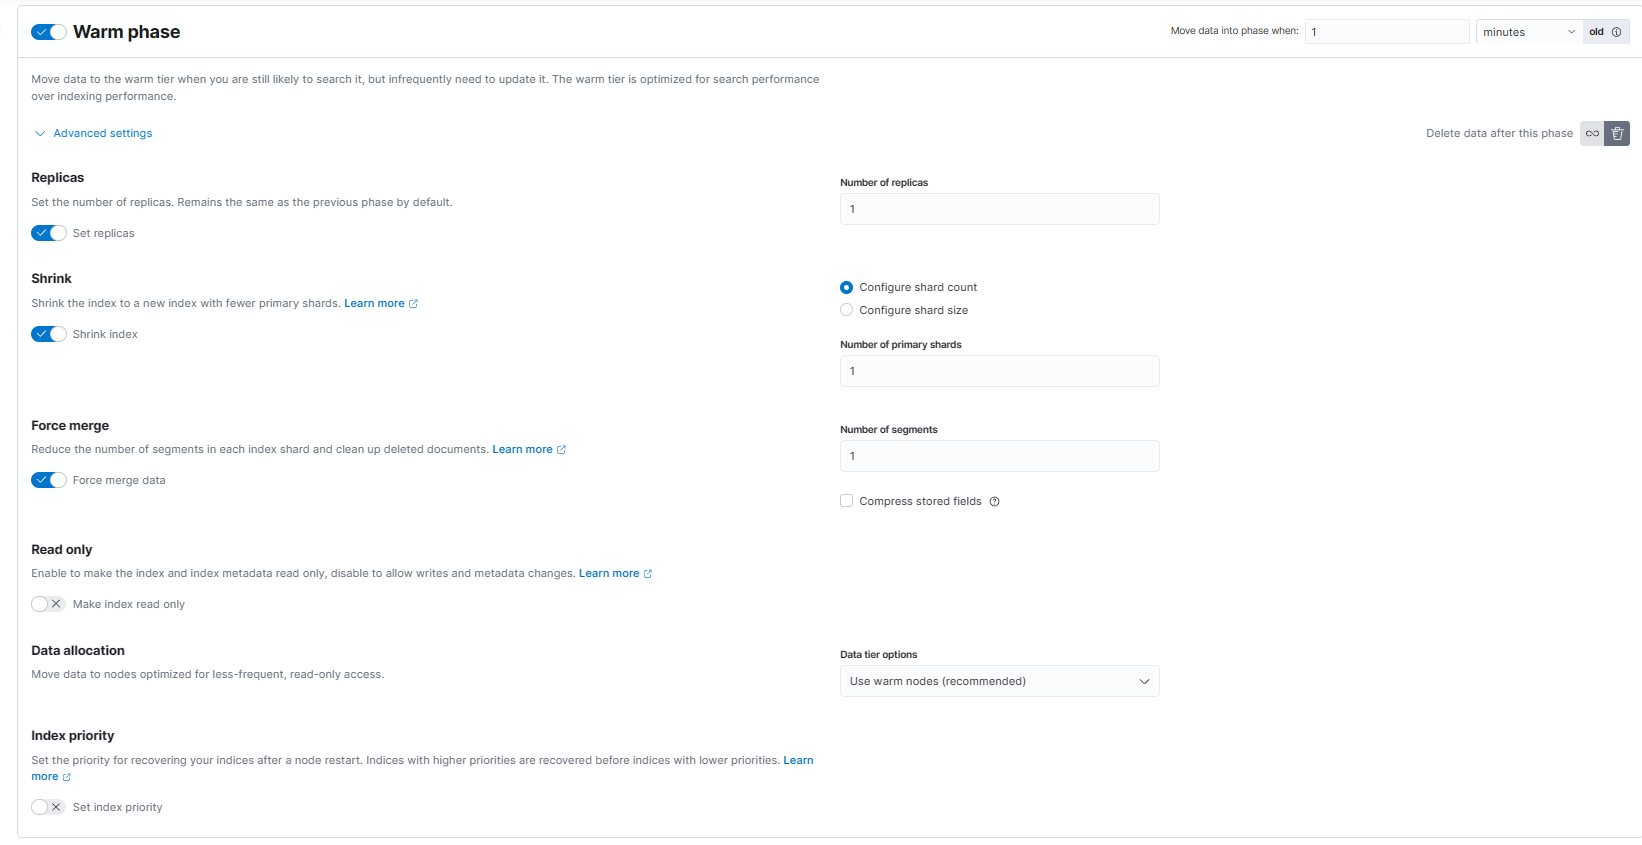
warm阶段
delete阶段
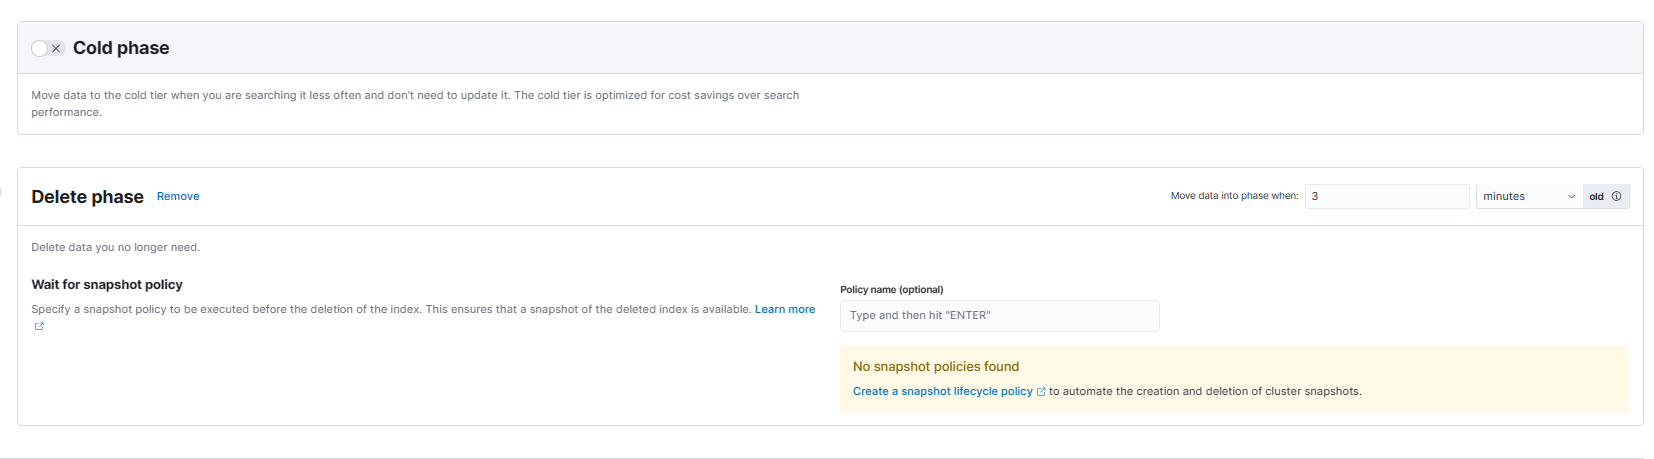
解释
集群中没有data_cold节点,所以没有添加cold阶段。
hot:索引只要满足其中任一条件:数据写入达到5GB、使用超过1分钟、doc数超过3,就会触发索引滚动更新rollover。此时系统将创建一个新索引,该索引将重新启动策略,而旧索引将在滚动更新后等待1分钟进入warm阶段。
warm:索引进入warm阶段后,ILM会将索引收缩到1个分片,强制合并为1个段,并从hot节点移动到warm(冷数据)节点。完成该操作后,索引将在3分钟(从滚动更新时算起)后进入delete阶段。
delete:索引进入delete阶段后被删除。
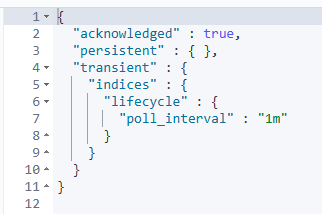
修改检测周期
ILM默认10分钟检测一次符合策略标准的索引,当达到rollover条件后,索引将滚动到下一阶段,可以配置indices.lifecycle.poll_interval参数,修改检测周期。这里测试改为了1分钟。参考官网:https://www.elastic.co/guide/en/elasticsearch/reference/7.17/ilm-with-existing-indices.html
PUT _cluster/settings
{
  "transient": {
    "indices.lifecycle.poll_interval":"1m"
  }
}
创建模板
名字为hot-template,修改index settings,绑定hot-policy,指定数据写入后存储到hot节点上,分片数为2,副本数为2,rollover后的别名为hot-index。
{
  "index": {
    "lifecycle": {
      "name": "hot-policy",
      "rollover_alias": "hot-index"
    },
    "routing": {
      "allocation": {
        "include": {
          "_tier_preference": "data_hot"
        }
      }
    },
    "number_of_shards": "2",
    "number_of_replicas": "2"
  }
}
基于序号创建初始索引
索引创建的名称应该是以 “-00001”等可自增长的字段结尾,否则策略不生效。
PUT hot-index-000001
{
  "aliases": {
    "hot-index" : {
        "is_write_index": true
    }
  }
}也可以基于时间创建索引,参考官网:https://www.elastic.co/guide/en/elasticsearch/reference/7.17/indices-rollover-index.html#roll-over-index-alias-with-write-index
写入数据
通过别名写入数据。当数据达到rollover条件,并触发ILM检测周期后,索引将进行滚动更新。这里写入5条数据。
PUT hot-index/_doc/1
{
  "name": "tom"
}
PUT hot-index/_doc/2
{
  "age": "20"
}
PUT hot-index/_doc/3
{
  "asd": "asd"
}
PUT hot-index/_doc/4
{
  "qwe": "qwe"
}
PUT hot-index/_doc/5
{
  "zxc": "zxc"
}
查看索引生命周期
每个阶段的action如下:
hot阶段
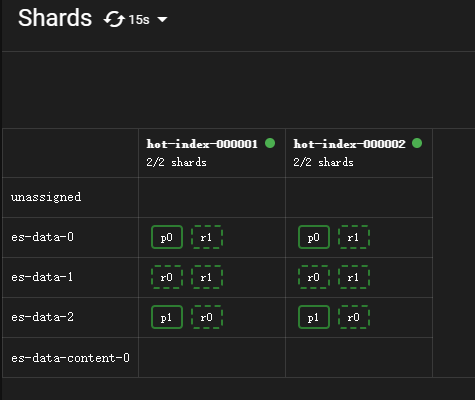
min_age为0ms,写入数据后,索引马上进入hot阶段。由于写入了5条数据,大于策略中的3条doc,等待1分钟的检测周期,进行滚动更新rollover。action时间为17:28:06。
查看索引状态:

查看分片情况:
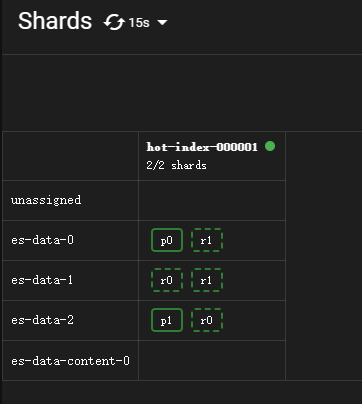
等待一分钟后,rollover完成,此时系统将创建一个新索引,该索引将重新启动策略。action时间为17:29:07。
查看索引状态:

查看分片情况:
旧索引将在滚动更新后等待1分钟进入warm阶段。
warm阶段
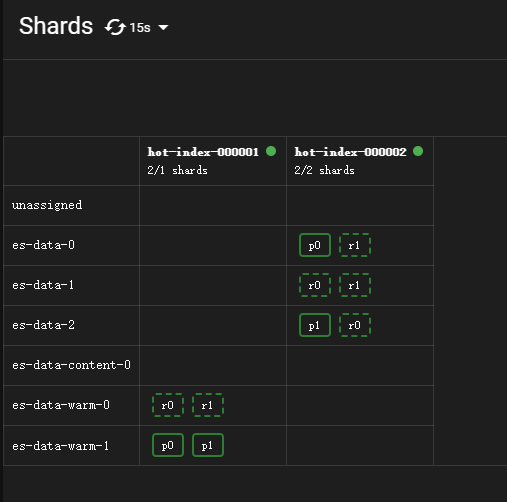
配置了location到warm节点上,同时配置了副本数修改为1,所以会先进行allocate操作,将副本数改为1。然后进行migrate操作,数据会移动到warm节点,索引状态为migrate,时间为17:30:07。
由于配置了shrink,所以warm阶段首先会进行shrink操作,将分片收缩到1个。action时间为17:31:07。
查看索引状态:

shrink操作还未完成,所以这里两个warm节点上都有数据。
查看分片情况:
1分钟后刷新,索引进入forcemerge阶段,将segment强制合并为1个段。action时间为17:32:07。
查看索引状态:

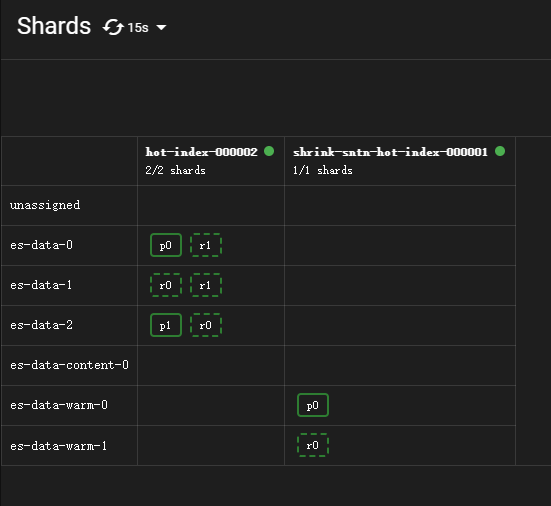
shrink收缩完成,新索引名称格式为shrink-<random-uuid>-<original-index-name>,这里就是shrink-sntn-hot-index-000001,分片数量也变为了1。
查看分片情况:
由于配置的delete阶段min_age为3分钟,所以这里再等一分钟就会进入delete阶段。
delete阶段
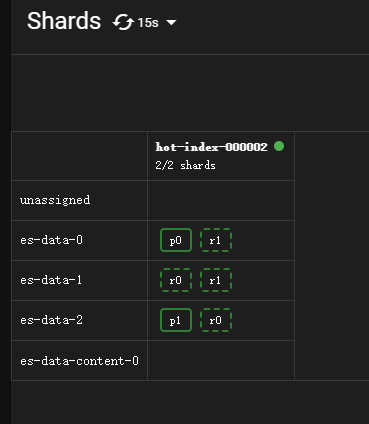
数据将被删除,action时间为17:33:07。
查看索引状态:

shrink-sntn-hot-index-000001 index已被删除,只有hot-index-000002了。
查看分片情况:
查询hot-index-000001索引,no such index。
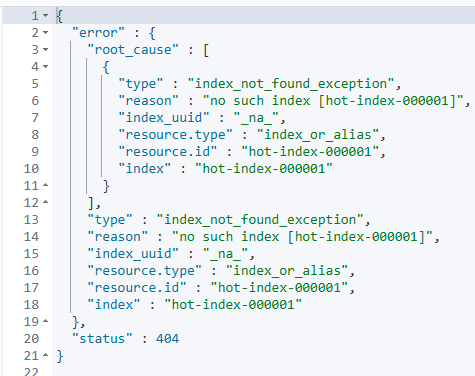
查看hot-index-000002 index状态,也进入了shrink。证明ILM策略正常生效。

如果要切换策略,新策略不会立即生效。当前正在滚动写入的索引依旧使用旧策略,直到当前索引rollover生成新索引,新策略才会生效。应用旧策略创建的索引,依旧绑定旧策略。如果要为这些索引绑定新策略,需要执行:
PUT hot-index-000001/_settings
{
  "lifecycle.name": "hot-policy2"
}
问题
我在warm节点上配置了node.attr.box_type: warm参数,重启了pod,参数也生效了。
GET _cat/nodeattrs/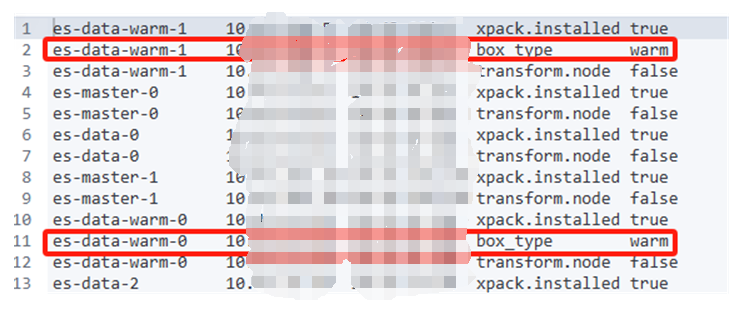
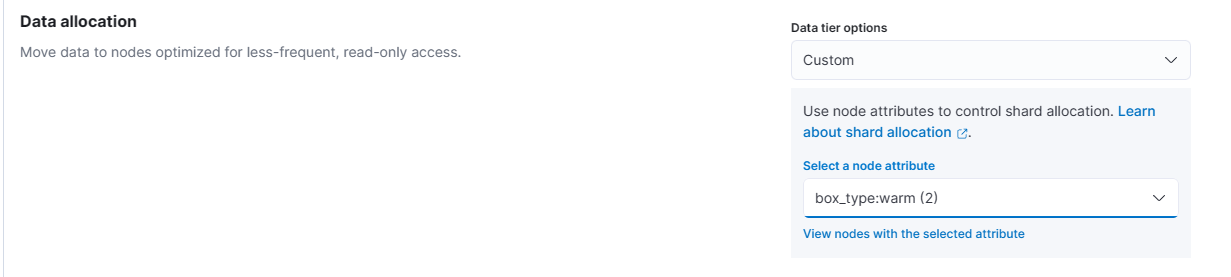
修改hot-policy中的location,改为custom,选择box_type:warm
创建索引后,发现卡在了warm的allocate阶段。
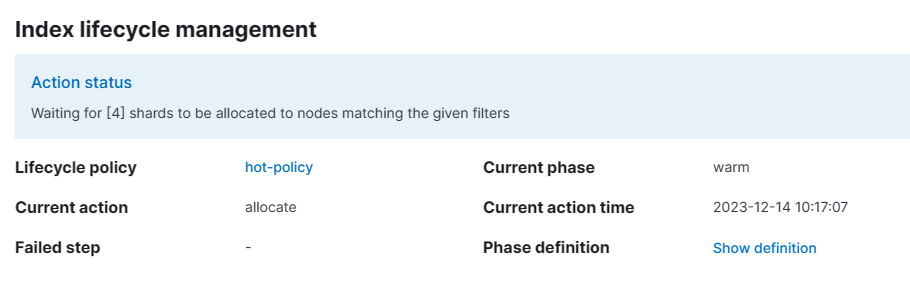
查看未生效原因:
GET hot-index-000001/_ilm/explain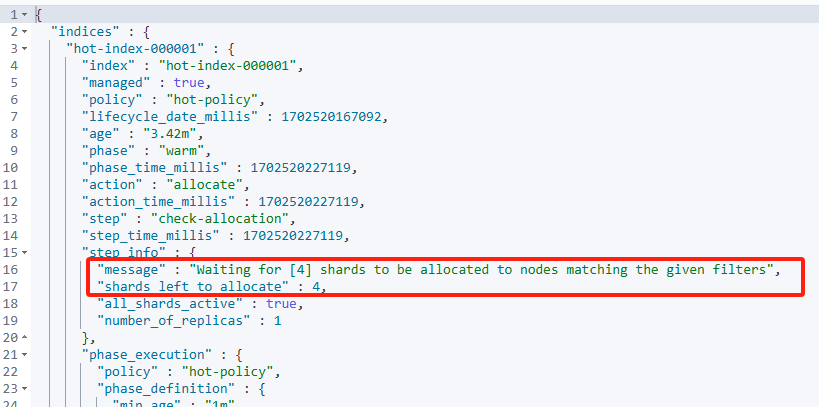
step_info中的message中显示: waiiting for [4] shards to be allocated to nodes matching the given filters,shards left to allocate: 4
shard没有分配到warm节点上。导致卡在了allocate action,查看index配置。
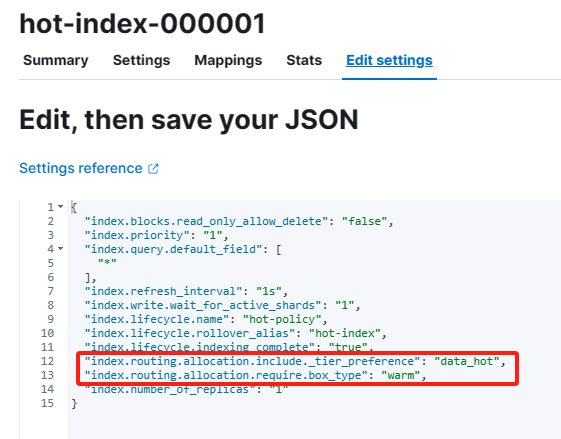
同时包含了"index.routing.allocation.include._tier_preference": "data_hot",和"index.routing.allocation.require.box_type": "warm",而warm节点上只有data_warm的tier,所以无法分配。
查看官方文档:https://www.elastic.co/guide/en/elasticsearch/reference/7.17/data-tier-shard-filtering.html https://www.elastic.co/guide/en/elasticsearch/reference/7.17/shard-allocation-filtering.html
在7.17.3版本中如果要匹配节点角色最好还是使用_tier。即index.routing.allocation.include._tier_preference,不要使用index.routing.allocation.require.attr